
C is for Crafts: Pink Witch Handprint Art
This is a sponsored post. Oriental Trading provided me with products for review. All opinions are 100% my own. This post may also contain affiliate links. Find my full disclosure here.
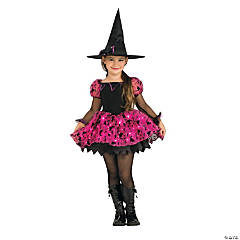
Halloween is a big deal in our house. My girls have been thinking about and planning their costumes since late summer. I have always taken this with a grain of salt as I know young children have a tendency to change theirs minds about a costume and then change their minds again before Halloween. Ava, however, has always stuck to her plans – two years ago she wanted to be a cowgirl and last year she was a ghost. She never wavered and never changed her mind. So this year when she announced that she would be a “pink witch” for Halloween I had no doubt that I would have to come up with a pink witch costume somehow! There was no need to worry though because my friends at Oriental Trading have the most amazing selection of Halloween costumes you can imagine. We found a darling witch costume that met Ava’s strict criteria right away – and the skirt even twinkles with little LED lights. She is so excited to wear it! In honor of my little pink witch, I have put together this simple tutorial on making a fun pink witch handprint art project. Are you ready to get started? Here we go:

Supplies
White cardstock
Black and lime green cardstock (for details)
Hot pink glitter cardstock (for frame)
Acrylic paint in bright pink
A container to hold the paint – I like to use recycled baby food containers for easy clean up!
Paint brush – I used a small foam craft brush
Cutting Board – I used a heavy weight plastic board
Masking tape or painters tape
Baby wipes and paper towel
Paper cutter or scissors
Glue stick
Black marker and/or fine tipped marker
Small pom pom (optional)
Step One – Paper
Carefully tape a piece of white cardstock to your cutting board – this will give you a nice hard surface for your child to press their hand onto when making the prints. For older kids, you can tape the cardstock directly to the table or another hard surface.
Step Two – Planning
Think about how to best place the handprints on the page. You will want to make sure you have enough space above the heel of the hand to add the hat. I like to make multiple prints at a time (like 6-8) – this way I can pick the best ones once they dry or send the extras to friends and family as holiday greetings.
Step Three – Making the Prints
Make sure you have your supplies within arms reach before you start painting. This includes extra paper, paint and your wipes and paper towel for clean up. The key is to work quickly and efficiently once you begin. Younger children can be contained in a highchair for the painting. Using a small foam brush I carefully painted one hand of my daughter’s hands with bright pink paint making sure it was thoroughly covered but not too thick. Be sure to get those little fingers good! I let her pick which hand to paint to give her some control over the project. We make it fun – making sound effects and pretending to tickle her palm always works well. Once the paint is applied, quickly and firmly place the hand onto the paper, pressing down gently on each finger to get good contact with the paper. Reapply the paint lightly between each print. After the last print is done, I wipe off the hand with baby wipes and then follow up with a paper towel to remove the remainder of the paint.
Young babies have a tendency to curl their toes and fingers under. In my infant massage training, I learned that by gently running a finger across the top of the toes, you can trigger a reflex that causes a baby to fan out their toes briefly. This also works to open clenched up little fingers.
Using the same bright pink paint, you can even out inconsistencies in the handprints to make them look more finished. You can use your pinky finger or a cotton swab to round out finger prints that didn’t make full contact with the paper if necessary. Let the prints dry thoroughly before adding the final details.
Step Four – Adding the Detail
Once the handprints were good and dry, I started adding the details with some simple cardstock cut outs. First I made the green hair by cutting a small rectangle of green cardstock for each side of the witch’s head. I carefully cut several narrow strips ensuring that I did not cut all the way to the top. I curled the hair upwards by wrapping it around a pencil to give it some dimension and then glued it to each side using a glue stick. Next I cut out the witch’s hat in two pieces – a triangle with a curved point for the hat and a simple oval for the brim. By cutting it out in two pieces, I was able to position it on the witch’s head at just the right angle and attach it with my glue stick.

Next for the face… I made the white circles for the eyes using a paper punch and adding the pupils with a black marker. I also added eyelashes with the black marker to give it some personality. I cut an oblong piece of green card stock for the nose, attached it with the glue stick, and added a mole with my black marker. I drew a simple mouth freehand with the black marker as well.
I cut a small curved band for the hat using the same pink glitter cardstock that I was planning to use for the frame and attached in to the hat just above the brim using my glue stick. The finishing touch was to glue a coordinating pom pom to the end of the witches hat for an extra touch of pink. Voila! A pink witch!
Step Five – Framing
Using my paper cutter, I trimmed up my pink witch to my desired size and cut a square of the hot pink glitter cardstock just slightly bigger than the print to act as a frame. I attached the print to the frame using just a few dabs of glue stick or some double stick tape. Don’t forget to finish the project by adding your child’s name and their age or the year somewhere on the print.

I am a sucker for hand and footprint art – I just can’t get enough. My girls have come home from child care with some adorable projects over the years. Awhile back I asked their teachers if they had any tricks for getting such great prints from even the littlest kids. They told me they teach the toddlers to give them high fives and practice it regularly in the classroom. Then when it comes to making a handprint they simply tell the child to give a “high five” and the child knows just what to do. How clever! My kids have gotten so used to doing these kinds of projects that they know the drill without much fuss or mess.
And now for the pink witch costume! Do yourself a favor a check out the Oriental Trading website if you are looking for a costume or accessory. The have a great selection for kids and adults of all ages! Seriously, how cute is this witch costume?!?
There you have it, my friends. A great pink witch costume and a darling pink witch handprint art project to go with it. We are ready for Halloween over here – that is unless, of course, this is the year that Ava changes her mind at the last minute. Let’s hope not! I would love to hear from you in the comment section about your plans for Halloween costumes this year. Wishing you and your little monsters a fun filled Halloween holiday! Xoxo, -Cristina

My posts are partying at these fun Link Parties and Blog Hops!