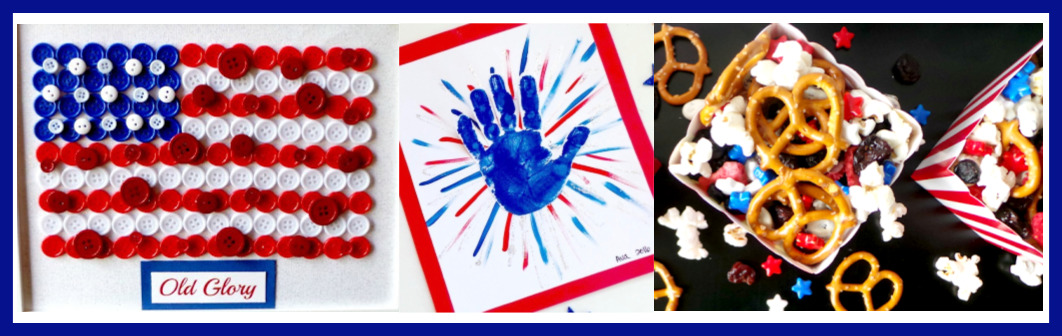

F is for Fourth of July: Make Your Own Patriotic Button Flag
This is a sponsored post. Oriental Trading provided me with these products for review. All opinions are 100% my own. This post may also contain affiliate links. Find my full disclosure here.
As you may already now, I just love the Fourth of July. It is such a fun and festive holiday to decorate for both inside and outside of the house. I seriously can’t get enough of all things red, white and blue this time of year! I have partnered with my friends at Oriental Trading to bring you another fun and colorful holiday project – a Make Your Own Patriotic Button Flag. Button crafts are tons of fun and Oriental Trading has a great selection of buttons to choose from. The main buttons I used for this project are even self-adhesive! Easy peasey! Are you ready to get started? Here we go:

Supplies
8 x 10 frame with the glass removed
8 x 10 piece of cardboard cut to fit the inside of your frame
White glitter cardstock or a background color/pattern of your choice
Pencil
Ruler or straightedge
Awesome Self-Adhesive Buttons from Oriental Trading
Additional craft buttons such as these Assorted, Rainbow or Winter collections from Oriental Trading
Craft glue or hot glue
Instructions
Begin by gathering your supplies. I had my girls sort out all of the red, white and blue adhesive buttons into a bowl for me ahead of time.
Carefully remove the glass from your frame and wipe away any dust or debris. Cut a piece of cardboard to fit snug inside the frame. This will become the backer board for your button flag. I used a piece of an old box. Use whatever you can find on hand that will give you a flat, firm surface to work on.
Next, cut a piece of cardstock for the background of your flag. I decided to use a piece of white glitter cardstock that I had on hand. You could use a pale sky blue, a navy blue, a pattern or just plain white. Use you creativity.
Place the cardstock and cardboard inside your frame and secure the back of the frame. Make sure that the cardstock lays flat and that nothing can move or shift inside the frame. If it is loose or wavy, trim the cardstock to lay flat or add an additional layer of cardboard to get a better fit. This is an important step so make sure to get it right before you start adding the buttons. You could use spray adhesive to attach the cardstock to the cardboard, but I did not.
Next lay out the pattern of a basic flag in your frame. Do not stick anything down yet! This might seem like extra work but it is important to get spacing correct. Once you are satisfied with the shape and placement of your flag, use a pencil to carefully mark the top corners.

Remove the loose buttons from the frame and draw a light pencil line using a straightedge to connect the top corners. Be sure that your line is straight and level.
Working from left to right, begin sticking your buttons to the cardstock following the line as your guide. Go slow and carefully to get the top line straight and even – this will create the guide for all of your subsequent lines. Continue to work from left to right and top to bottom until the bottom layer of your flag is completed. If you like the way it looks, it could be done at this point as just a simple single layer button flag.

If you want a more decorative button flag, add additional craft buttons in various shapes and colors over the top of the base flag use small dabs of craft glue or hot glue. Here is another opportunity to let your creativity shine through! I used hot glue because I am too inpatient to wait for craft glue to dry. Haha! I did spend some extra time removing some loose strings from the hot glue though.
When you are satisfied with your flag, allow the piece to dry thoroughly before displaying with other patriotic decor. I decided to add a small sign at the very bottom of my button flag with the title “Old Glory” printed out on cardstock. This added detail is completely optional. That’s all there is to it! You are a button flag making rock star!
Another fun and festive (and educational!) activity we have been enjoying as a part of our Fourth of July celebrations this year is this great Presidential Bingo game. My girls love bingo so when I came across this set I knew we had to have it. What a great way to learn more about the history and presidents of this great country! I love it when we can play and learn at the same time. The grown-ups in our family have enjoyed the history refresher too. The game comes with sturdy game cards and calling cards packaged nicely in a festive storage box. Although cute little marker cards are also included, we like to sweeten the deal by using Hershey kisses to mark the squares.

If you have never visited the Oriental Trading site, you are missing out on a great resource for all your party, holiday and entertaining needs. From toys and games to party decorations and tableware to great craft supplies, Oriental Trading has something for everyone! Take a peak at their amazing 4th of July page for great party favors, accessories, parade and party ideas to help make your holiday weekend amazing. There are so many darling crafts, gifts and decorations too. Oriental Trading also has a fun blog page full of recipes, party ideas, tablescapes, crafts, educational activities and more. Looking for a deal at Oriental Trading? Visit their coupon page for the latest sales.

I hope you have a great time making this fun patriotic button flag. I would love to see a picture of how your flag turns out or hear your suggestions and ideas in the comment section. If you are looking for more fun and simple patriotic projects, you might enjoy my Handprint Fireworks project – it is one of Ava’s Alphabet’s most popular posts! Wishing you and yours a very happy and safe Fourth of July holiday! Happy crafting, my friends! Xoxo, -Cristina
My posts are partying at these fun Link Parties and Blog Hops!